Contributing to TensorFlow Community
Installing the TensorFlow (TF) is fairly well documented in the official documentation, however, when I was rewriting some of the parts, I had to get both the Stable and the Developer versions. In here I will go through TensorFlow installation for both versions in the VirtualEnv.
- Install Using
pip(non-dev) - Install from
masterBranch - File an issue report and submit a pull request (PR)
Install Using pip (non-dev)
Note: You might need the non-developer, stable version of TF if you work on other machine learning projects
We will be using a Virtual Environment tf-env.
Note, that you will need to have virtualenv and virtualenvwrapper installed.
$ mkvirtualenv tensorflow --system-site-packages
$ workon tf-env
(tf-env)$ pip install tensorflow
If you want to install a specific version, and not rely on the PyPI, you can get the specific version path here, and install it using the following (you will need to change the TF_BINARY_URL to your own system).
$ workon tf-env
(tf-env)$ # Mac OS X, CPU only, Python 2.7:
(tf-env)$ export TF_BINARY_URL=https://storage.googleapis.com/tensorflow/mac/cpu/tensorflow-0.12.0-py2-none-any.whl
(tf-env)$ pip install --upgrade ${TF_BINARY_URL}
And, you are done! If you are not planning on working with the source codes, just use the pip installation. Whenever you need to use tensorflow, just switch to your environments, and you are done:
$ workon tf-env
(tf-env)$ python
  Python 2.7.13 (default, Dec 18 2016, 07:03:39)
  [GCC 4.2.1 Compatible Apple LLVM 8.0.0 (clang-800.0.42.1)] on darwin
  Type "help", "copyright", "credits" or "license" for more information.
>>> import tensorflow as tf
>>> tf.__version__
  '0.12.0'
>>>
Install from master Branch
I am assuming you are not using the “easier” pip installation because you want to contribute to the community. That means, you need to have a forked repository… So, let’s start from GitHub
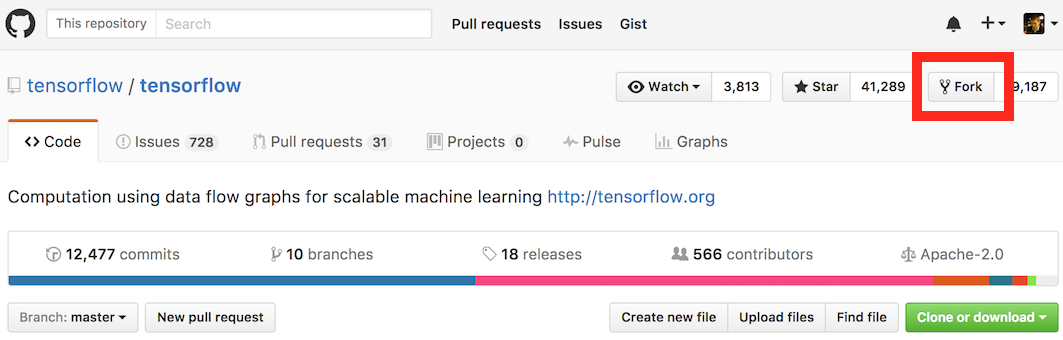
Create a fork and clone it
Navigate to the GitHub TensorFlow repo, and fork it using the button in the top right that looks like this: Fork
At this point, if you navigate to your own GitHub account, you will find a new repository named .../tensorflow. You can find the clone path shown here
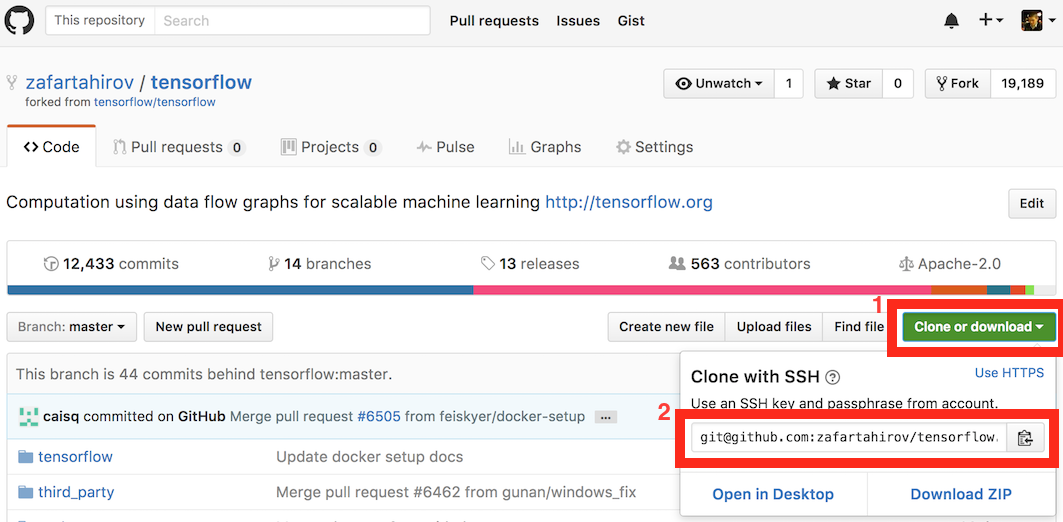
If you didn’t setup the SSH, you can pick the HTTPS option above
$ cd ~/GitHub
$ git clone git@github.com:zafartahirov/tensorflow.git # Replace the username here
$ cd tensorflow
$ git remote -v
  origin  git@github.com:zafartahirov/tensorflow.git (fetch)
  origin  git@github.com:zafartahirov/tensorflow.git (push)
$ # Note that you will have a different username
Notice that the origin repository is your own account on GitHub. You might want to add another origin, so you could easily synchronize your repo with the official one.
$ cd ~/GitHub/tensorflow # This is where I forked the TF
$ git remote add upstream https://github.com/tensorflow/tensorflow.git
$ git remote -v
  origin  git@github.com:zafartahirov/tensorflow.git (fetch)
  origin  git@github.com:zafartahirov/tensorflow.git (push)
  upstream  https://github.com/tensorflow/tensorflow.git (fetch)
  upstream  https://github.com/tensorflow/tensorflow.git (push)
Now if you want to synchronize your repository with the official one, just do
$ git fetch upstream
$ # If you want your current commits to replay on top of the official master
$ # (just to check if any conflicts would happen)
$ git checkout master # or any branch you might have
$ git rebase upstream/master
$ #
$ # Upload your changes to your GitHub
$ git push -f origin master
Compile (Python 2.7)
I am assuming you are using brew on OS X, and you have Python installed
$ brew install bazel
$ pip install six
$ pip install numpy
$ pip install wheel
Note that I am installing the python packages globally, and not in my virtual environment.
This would probably be a good time to create a virtual environment for our dev version of the TF – I am going to use tf-dev-env for the development version of the tensorflow.
$ mkvirtualenv tf-dev-env --system-site-packages
  New python executable in ~/.virtualenvs/tf-dev-env/bin/python2.7
  Also creating executable in ~/.virtualenvs/tf-dev-env/bin/python
  Installing setuptools, pip, wheel...done.
$ workon tf-dev-env
(tf-dev-env)$ python -c "import tensorflow"
  Traceback (most recent call last):
    File "<string>", line 1, in <module>
  ImportError: No module named tensorflow
Run the configuration – I will not go through every question, as it is well documented on the TF website
(tf-dev-env)$ cd ~/GitHub/tensorflow
  # We want to install from the working branch
  # But you can pick the latest (I tested the r0.12)
(tf-dev-env)$ git fetch
(tf-dev-env)$ git checkout remotes/upstream/r0.12
(tf-dev-env)$ git checkout -b r0.12 # Create a local branch
(tf-dev-env)$ ./configure
  ~/GitHub/tensorflow ~/GitHub/tensorflow
  Please specify the location of python. [Default is ~/.virtualenvs/tf-dev-env/bin/python]:
  Do you wish to build TensorFlow with Google Cloud Platform support? [y/N] N
  No Google Cloud Platform support will be enabled for TensorFlow
  Do you wish to build TensorFlow with Hadoop File System support? [y/N] N
  No Hadoop File System support will be enabled for TensorFlow
  Found possible Python library paths:
    ~/.virtualenvs/tf-dev-env/lib/python2.7/site-packages
  Please input the desired Python library path to use.  Default is [~/.virtualenvs/tf-dev-env/lib/python2.7/site-packages]

  Using python library path: ~/.virtualenvs/tf-dev-env/lib/python2.7/site-packages
  Do you wish to build TensorFlow with OpenCL support? [y/N] N
  No OpenCL support will be enabled for TensorFlow
  Do you wish to build TensorFlow with CUDA support? [y/N] N
  No CUDA support will be enabled for TensorFlow
  Configuration finished
  Extracting Bazel installation...
  .......................
  INFO: Starting clean (this may take a while). Consider using --expunge_async if the clean takes more than several minutes.
  ............
# Some messages here
  INFO: All external dependencies fetched successfully.
Build and install (dev)
Now we can install the TF from source. Because we want to install for development, meaning we will be modifying and testing it many times, we want to have symlinks in our site-packages directory, and not copied versions.
Notice the --copt=-march=native in the code below. This argument specifies that we will be running TF on our own machine only, and there it could optimize it for it specifically (makes it faster)
$ cd ~/GitHub/tensorflow
$ workon tf-dev-env
(tf-dev-env)$ bazel build --copt=-march=native -c opt //tensorflow/tools/pip_package:build_pip_package
  ## VERY LONG PROCESS HERE ## MANY WARNINGS ##
  INFO: Elapsed time: 2425.321s, Critical Path: 2282.43s
(tf-dev-env)$ mkdir _python_build
(tf-dev-env)$ cd _python_build/
(tf-dev-env)$ ln -s ../bazel-bin/tensorflow/tools/pip_package/build_pip_package.runfiles/org_tensorflow/* .
(tf-dev-env)$ ln -s ../tensorflow/tools/pip_package/* .
(tf-dev-env)$ python setup.py develop
  running develop
  .........
  Finished processing dependencies for tensorflow==0.12.1
Done! You can test your installed version of the TF simply by
$ workon tf-dev-env
(tf-dev-env)$ cd ~/GitHub/tensorflow/tensorflow/models/image/mnist
(tf-dev-env)$ python convolutional.py
  Successfully downloaded train-images-idx3-ubyte.gz 9912422 bytes.
  Successfully downloaded train-labels-idx1-ubyte.gz 28881 bytes.
  Successfully downloaded t10k-images-idx3-ubyte.gz 1648877 bytes.
  Successfully downloaded t10k-labels-idx1-ubyte.gz 4542 bytes.
  Extracting data/train-images-idx3-ubyte.gz
  Extracting data/train-labels-idx1-ubyte.gz
  Extracting data/t10k-images-idx3-ubyte.gz
  Extracting data/t10k-labels-idx1-ubyte.gz
  Initialized!
  Step 0 (epoch 0.00), 4.5 ms
  Minibatch loss: 8.334, learning rate: 0.010000
  Minibatch error: 85.9%
  Validation error: 84.6%
  Step 100 (epoch 0.12), 186.5 ms
  Minibatch loss: 3.247, learning rate: 0.010000
  Minibatch error: 6.2%
  Validation error: 7.5%
  Step 200 (epoch 0.23), 184.6 ms
  Minibatch loss: 3.345, learning rate: 0.010000
  Minibatch error: 10.9%
  Validation error: 4.3%
  .........
File an issue report and submit a pull request (PR)
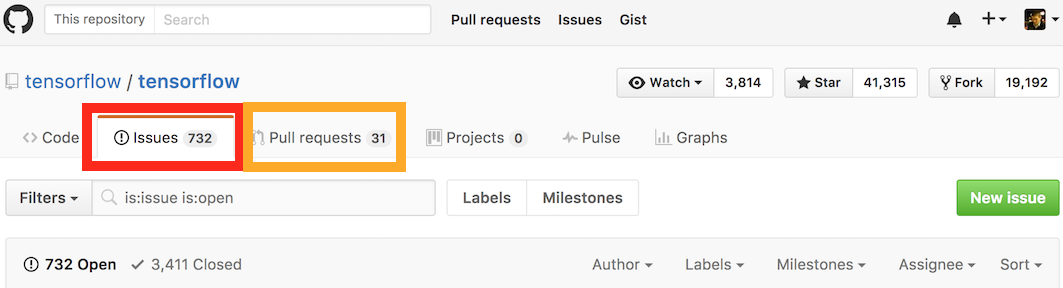
Before you decide to change anything in the source, you absolutely HAVE TO check if there is a fix for it pending already. That is why, there is a tracking system for all features, issues, and bugs. Go to the main TF GitHub bage, and click on the “Issues” button and use some keywords to find a relevant post.
Only if you did not find any issue, you can create a “New Issue”.
Finding a bug and Creating Issue
Suppose you found a bug. For example, you look through the source code,
and in file tensorflow/configure you notice the following
1
2
3
4
5
6
7
8
9
10
#!/usr/bin/env bash

set -e
set -o pipefail

# Find out the absolute path to where ./configure resides
pushd `dirname $0` #> /dev/null
SOURCE_BASE_DIR=`pwd -P`
popd > /dev/null
.........
Notice what lines 7-9 do: they push the current directory to the directory stack, assign the current directory to the $SOURCE_BASE_DIR, and after that pop the directory from the stack. Most probably this is done for the cases when the script is run from a directory different from TF root.
We cannot really fix it (there might be a reason why it is there), but what we also notice is that the pushd is not silenced, and thus repeats the directory name when we run the configure script.
You can see the issue I have submitted about it here
Submitting a Pull Request
To submit a Pull Request (PR), you first need to check if there is a fix pending. Just search the same way you would search for an issue, but under the “Pull requests” tab on GitHub. If you don’t find it, just create a new PR, describe what it fixes, mention the issue number that it resolves and you done.
Let us silence the pushd and submit it as a PR.
Create a branch with the fix
Never try to change the master branch – this causes confusion, and overall not a right way of doing it. You will have to roll back a lot if you do.
Create new branch called silence-pushd
$ cd ~/GitHub/tensorflow
$ git checkout master
$ git pull
$ git checkout -b silence-pushd
$ git branch
    master
    r0.12
  * silence-pushd
Implement your changes
Modify the files you need, and test the final result. In my case, I will just silence the pushd in the configure scipt like so
1
2
3
4
5
6
7
8
9
10
#!/usr/bin/env bash

set -e
set -o pipefail

# Find out the absolute path to where ./configure resides
pushd `dirname $0` > /dev/null
SOURCE_BASE_DIR=`pwd -P`
popd > /dev/null
.........
Now add, commit, and push the changes to the origin/silence-pushd
$ git add ./configure
$ git commit "Silenced the 'pushd'"
$ git push origin silence-pushd
Counting objects: 3, done.
Delta compression using up to 4 threads.
Compressing objects: 100% (3/3), done.
Writing objects: 100% (3/3), 298 bytes | 0 bytes/s, done.
Total 3 (delta 2), reused 0 (delta 0)
remote: Resolving deltas: 100% (2/2), completed with 2 local objects.
To github.com:zafartahirov/tensorflow.git
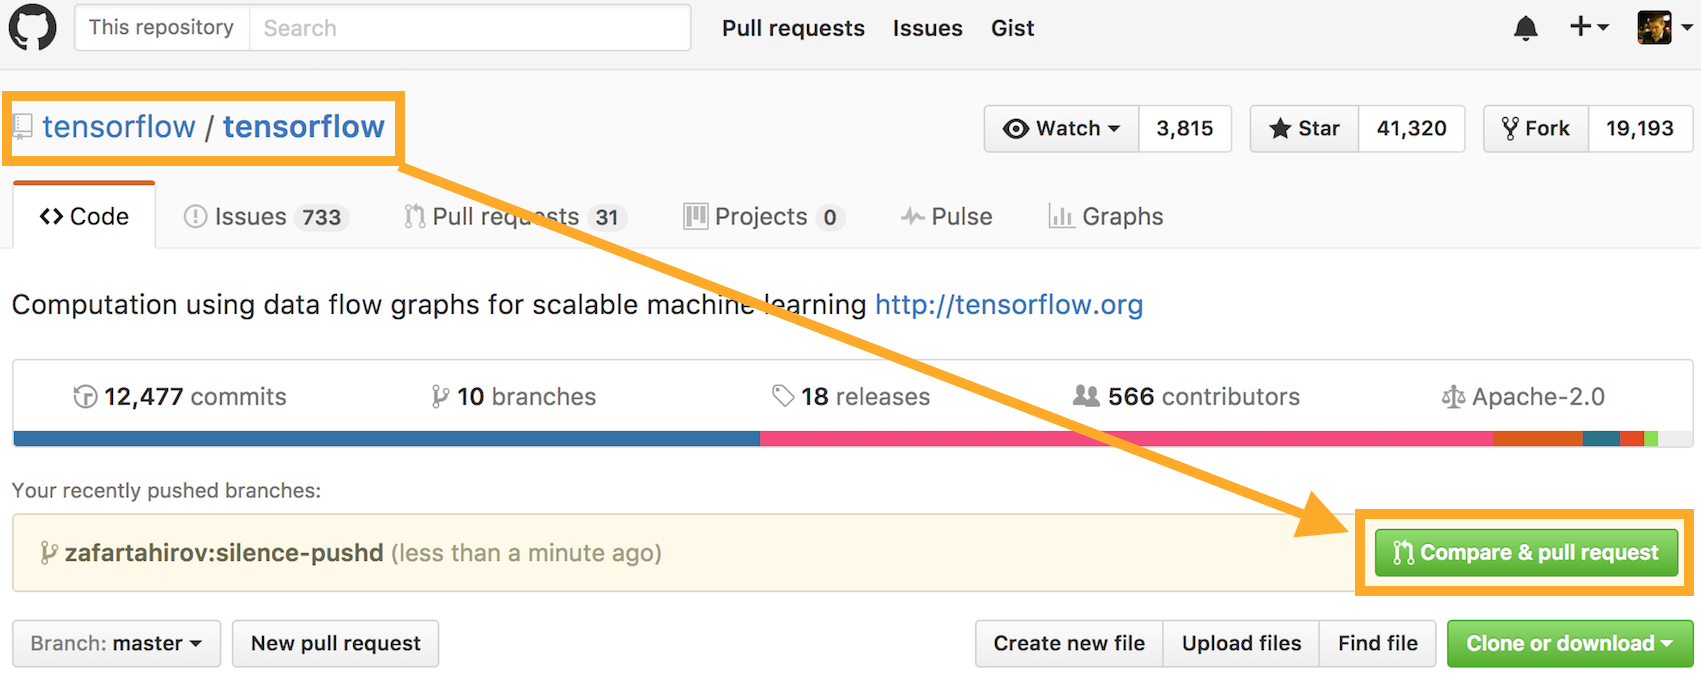
* [new branch] silence-pushd -> silence-pushdSubmit a PR
Now you can go ahead, and submit a PR on GitHub. Just write the description, and you are done. You can see the submitted PR here